Scrivener Ninja

I recommend [Scrivener][] as **the** application for doing long-form writing. But since I’m no longer in academia and I don’t write creatively, I don’t often use the program—unless my blog articles run away from me. (Besides, my [vim][macvim] keybinding addiction is enabled by [QuickCursor][]). Even when I do, it is pretty much limited to its [MultiMarkdown][] export to HTML for notetaking.

The other day, I noticed they added a tutorial document to the application itself. I decided to go through it.

Scrivener Tutorial

This screenshot shows both normal and “smart” collections, split screens with audio dictation handling, custom templates with custom icons, and that I love my boo 🙂

Very cool. I learned a lot that I didn’t get (not) slogging through the complete(ly boring) user manual.

Now if only if I can figure out some reason to actually use the program… 😀

[Scrivener]: http://www.literatureandlatte.com/scrivener.php “Scrivener—Literature and Latte”
[QuickCursor]: http://www.hogbaysoftware.com/products/quickcursor “QuickCursor: Your Text Editor Anywhere for Mac—Hog Bay Software”
[MultiMarkdown]: http://fletcherpenney.net/multimarkdown/ “MultiMarkdown”
[macvim]: http://code.google.com/p/macvim/ “macvim: vim for the Mac”

Carrying a camera

It’s been a while, but now that I’m almost moved in to the new place, I think it’s high time I start photographing again. Mostly this means carrying around the camera, even if I haven’t gotten used to pressing the shutter button again.

Recently, “the camera” means my trusty Leica and [the original lens I purchased with it](http://terrychay.com/article/cosina-voigtlander-lenses.shtml “The crack cocaine of the Leica World. I have five M-mount lenses, but this is still my favorite. Maybe because I’m used to the focal length; maybe it’s because it is silver.”).

Marie at the Food Court

Marie at the Mall
Stonestown Mall, San Francisco, California

Leica M8, Cosina-Voigtländer NOKTON 35mm F1.2 Aspherical
1/60sec, iso 160, 35mm (47mm)

Continue reading about shooting a digital Leica after the jump.

Our Lucy Liu

In the Japantown parking lot, my girlfriend starts the topic:

Her: My roommate, Nora, moved down to Los Angeles the other week.

Me: Yeah?

Her: …and already someone down there stopped her in the street and told her she looks like Lucy Liu.

Even *I* get that a lot…

Me: Oh God! She looks nothing…

Her: Yeah, anytime white guys see a pretty asian girl, they say she looks like Lucy Liu.

Me: Ha! …or Michelle Yeoh.

Her: Because they’re the only two asian people they know.

Me: And if it’s a guy it’ll be Chow Yun Fat or Jet Li.

Her: White guys thinks it’s a compliment. But what they’re really saying is, ‘All Asians look alike to me.’”

DSC_5201

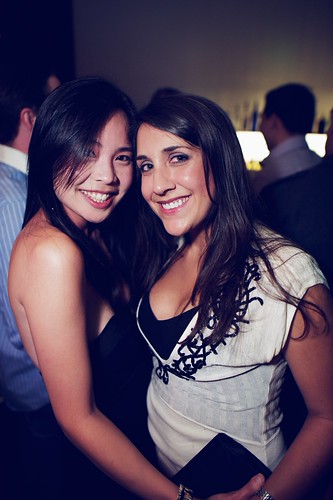
Nora and friend
Steak A5A, North Waterfront, San Francisco, California

Nikon D3, Nikkor 24mm f/1.4G, SB-900
1/24sec @ ƒ/2, iso2000, 24mm

Nora at her going away party. (For you white people, Nora is the one in the picture that looks like Lucy Liu.)

Me: I wonder which one they say I look like?

Her: Umm……

Me: …probably Michelle Yeoh.

(If she wasn’t parking at that moment, she’d have hit me.)

DSC_5203

Nora
Steak A5A, North Waterfront, San Francisco, California

Nikon D3, Nikkor 24mm f/1.4G, SB-900
1/25sec @ ƒ/2, iso2000, 24mm

Now that you mention it, she does sort of remind me of Chow Yun Fat.

When (to learn more about) dSLR (photography) [The entry kit dSLR Part 7]

(Article continued from part 6)

Recall the story of the enthusiast and the entry-level dSLR photographers trading cameras. While I admonished against the danger of buying too much of a dSLR, I glossed the obvious problem: the entry-level photographers had a problem shooting the professional dSLR. How do you get there from here?

The answer is simple: learning.

Inside every dSLR is a complex computer and that computer makes decisions for you. This is true in both the entry and pro dSLRs: the difference is the entry-level cameras are configured to make more decisions for you. The trick is to realize that the entry-level cameras give you access to the pro-level settings, but you have to be willing to leave the safety of automation in guides, scenes, and McDonald’s-style graphical menus.

I’m not a snob. There is nothing wrong with those features and the computer makes some pretty smart decisions. It’s just unless you are bumping your head against the decisions it makes, you’re limiting yourself in the sort of photography you can do.

Marie at The Corner

Marie at The Corner
The Corner, Mission, San Francisco, California

Nikon D3, Nikkor 50mm f/1.4G, SB-800
1/20sec @ f/3.5 iso3200, 50mm

This series had an inside joke. While it is a discussion of dSLR cameras, every photo was supposed to be taken with a non dSLR camera. Unfortunately, this photo is simply too difficult to be taken by anything other than a SLR.

In this case, you can’t take this photo with the scene modes in your dSLR. Yes, the “night portrait” mode might get you close, but you’d need to pump the ISO even further, drag the shutter even more, change the white balance to incandescent, and set the flash curtain to front.

If you mouseover the image, you’ll see the original. My camera broke and decided to only record in TIFF that day, so I couldn’t have even depended on the RAW mode safety net for dynamic range and white balance recovery.

Even if we restrict ourselves to discussion of the same composition in the same camera, we are still left with setting shutter speed, aperture, and ISO. These three have a complementary relationship and are associated with different tradeoffs. Scene modes in your camera make the decision for you, but unless you know what that decision is and when it is wrong, you can’t really grow as a photographer.

P3010840

A plethora of learning materials exist out there. Here are a few of the ones I’ll be mentioning in this article.

Continue reading about books, videos, and classes after the jump

Blame it on Bollywood

Yesterday, I walked onto a Bollywood set.

Literally.

On my way back from McD’s, my apartment building was lit by three lighting/grip trucks. The lights were overpowering the sun.

Lighting my building

Lighting my building
4th and Brannan, South of Market, San Francisco, California

Olympus E-P2, Panasonic Lumix G 1:1.7/20 ASPH.
1/4000sec @ ƒ1.7, ISO200, 20mm (40mm)

Carrying McDonalds and shooting from the hip at the same time. Take that, Leica!

Continue reading

How (I purchased a kit) dSLR [The entry kit dSLR Part 5]

(Article continued from part 4)

The big C and the Big N

The Nikon D3000 ($450 from Adorama, B&H, Amazon)
The Canon EOS Rebel XS (1000D) ($500 from Adorama, B&H, Amazon)
The Nikon D5000 ($690 from Adorama, B&H Amazon)
The Canon EOS Rebel T1i (500D) ($770 from Adorama, B&H, Amazon)
The Canon EOS Rebel T2i (550D) ($900 from Adorama, Amazon)

Canon kits

The Canon 1000D and Canon 500D
Nikon D5000 and Nikon D3000

The Nikon D5000 and Nikon D3000

Even though I’ve tried to encourage you to buy a Pentax, Sony, or Olympus, I know most of you are going to be going to buy a CaNikon anyway. *sigh*

First off, debating between Canon and Nikon is like getting into a Mac vs. PC flame war. And like modern day Macs and Windows PCs they share more in common with each other than differences. Let’s disclose our biases up front: I’m a Nikon guy. If you’re going to buy Canon the only redeeming thing about me is that I’ve probably sold as many Canon cameras to friends as Nikons.
Continue reading about About entry level Canons and Nikons and what camera I purchased after the jump

2010-01-16 Melanie’s Bday

From a previous article, I finally found a way to work in Aperture again. But since I’m also trying to pick up photography again, I thought it’d be fun to write a little bit showing a few experimental images taken from that day.

This will be a way to test out a new WordPress plugin I just wrote to do mouseovers. As long as you’re on this blog article, you can run your mouse over the image to see the pre-processed original image.

The specials are…

The specials are…
Mission Beach Cafe, The Mission, San Francisco, California

Olympus E-P2, M. Zuiko Digital ED 14-42mm 1:3.5-5.6
1/5sec @ ƒ3.9, iso 1600, 17mm (35mm)

I arrived a little late as usual, but just in time to order dinner with everyone else.

This was actually the first image I used to test out whether the workflow works. Because of that, the DNG output was 8-bit, not 16-bit. That may have accounted for the overaggressive smoothing, or it could be the lack of dynamic range in an ISO 1600 µ4:3 CMOS sensor (roughly 1/4 the size of a 35mm frame). Then again, maybe it’s the setting on Topaz Adjust plugin. In any case, it does have the painterly look that you get when you start remapping dynamic range of an image. Not too sure if I can still call this a photograph.

If you mouseover the image, you may be wondering how I pulled color from the black-and-white original. The original is the JPEG, but the image was generated from the RAW. For documentary photography, on cameras which resemble rangefinders like the Leica M8 and the Olympus E-P2, I prefer black-and-whites previews, which force me to concentrate on tone and not color—but it’s always nice to be able to grab the color channels from the RAW if I change my mind.

This exposure tests the outer-limits of the kit lens: 1/5 of a second at a borderline too-high-for-this-camera ISO at the largest aperture for this 35mm EFL. Had I my old 17mm pancake, I’d have gotten a full stop faster. Still, it got focus-lock and the in-body image stabilization allowed me to shoot handheld braced against elbows on the table. Yeah!

More photos in later pages…